Posts

Showing posts from October, 2013

Halloween 2013 Skittles!!
Image
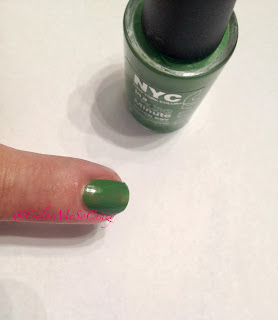
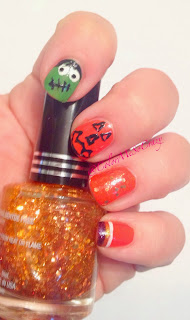
So, here's my Halloween 2013 Skittle Art. Yes, another skittle. I think that I have slacked a lot this season, so I had to quick make up for it all in one mani. That's what I did!! I hope that you all enjoyed my tutorials that I did leading up to this and I hope to do some more like it for the following holidays to come!  I used my Frankenstein tutorial for my pointer nail. I did a jack-o-lantern for my middle finger (or tall man as my son says). Next was just a glitter sandwich with orange creme color by Sinful Colors and then the glitter by Jordana.  The thumb is the same orange creme with glitter on top and then 2 glitter stripes in the corner.  For the pinky, I used the orange creme and did a french with 3 different colors. Purple, gold and white! Jordana- Copper Blaze Sinful Colors- Time Off Sinful Colors- Flower Girl Sinful Colors- Citrine Sinful Colors- Snow Me White NYC- High Line Green

Sonoma Nail Art and OMG Does Halloween

Image
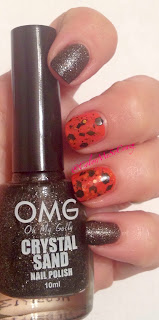
Yes! Another "witch combo". I think these purples during Halloween remind me of the witching hours and I loooooooove it! Yes, purple is my favorite color <3 Anywho, I am totally in love with the OMG crystal sands. They are sooo pretty and sparkly and definitely a dupe for some of the Zoyas. I did not top coat them because I really like the rough texture. It soothes me throughout the day<---------Polish Addict Words. I also must say that the polish is fairly easy to take off. I use the cotton ball-piece-let rest method. I will have to tutorial this, but I first saw it when I tried the foil remover method. I only had enough cotton balls for 6 fingers, so I tore pieces off to share with the other 4 nails. Anyway, I'll save the other 12 paragraphs of this tutorial for another day! So onto the love of purple montage!! Enjoy and stay tuned for my last post of this SPOOKY DAY! Sonoma Nail Art- Halloween in the Vines OMG- Opal

Philly Loves Lacquer and OMG Does Halloween

Image
*Both polishes in this post were won in giveaways and not purchased by me. I have not received any compensation from either.  Ahhhhhhh pure Halloween!! I won 2 polishes from Philly Loves Lacquer  just in time for the happy holiday. I haven't used the second one yet, but I have a great plan for it. It's pretty awesome.  For this mani, I used the OMG without a topcoat, because I have that weird thing with feeling the crystal sand. I also put a coat of Sinful Colors Citrine under the Philly Loves Lacquer to make it pop. Philly Loves Lacquer says this a Halloween polish and to commemorate a rival hockey team in Philadelphia that I cannot mention, but I will ignore that part since I am a Pittsburgh Girl! This baby has " micro hexes, micro bars, stars, dots, rectangles, and matte orange hexes, ultrafine orange micro glitter, and orange holo hex" all in that bottle. Good thing is, I didn't even have to fish! Ok, so I'm a fan of hers already! So, to bump th

Cute Frankenstein Tutorial

Image
How much do you love this guy?!? You can always play with the eye and mouth placement for different expressions on your little guy! Colors used: NYC- High Line Green Sinful Colors- Time Off Sinful Colors- Snow Me White 1. Start with your base color. I chose to use green, because well, Frankenstein is green. You can pick which ever color you want! 2. Then, take your dotting tool and dip it in your white for the whites of the eyes in your guy.  3. Then take your dotting tool again (you can use a striping brush if you are better with that) and dip it in your black to make your hair and eyeballs. I just did 3 or 4 strokes for the hair and 2 dots for the eyes. 4. Next take your striping brush or dotting tool and make a diagonal line for the mouth. You can play with the length and the angle to change the expression. 5. Then make opposing lines to make the stitches on the mouth. You can make then whatever length and thickness you want, as well.

Pretty Bloody Drips Tutorial

Image
Well, I did a gross blood drips. Now, I will do a pretty one. With glow in the dark polish and hearts and butterflies. Well not all that, but it does have glow in the dark polish. Super sweeeeett!!! Colors Used: Sinful Colors- Candy Coated Sinful Colors- Snow Me White Sinful Colors- Glow in the Dark  1. Paint your base color. I used Candy Coated by Sinful Colors.   2. Next, I added the glow in the dark color. This is the easiest way to use the glow with this art as it will be too hard to add it to the drips.  3. Next, take a white polish on a dotting tool. I like to use the biggest one I have to make a nice big gloppy dot.  4. Then, make gloppy dots. The trick is to make them gloppy enough that you can use polish from the dot, but keep the dot shape.  5. You want to make a couple random dots on your finger. I just did 3 because I have ridiculously small nails that's all that will fit.  6. You will then take the glops and pu

Spider Web Tutorial

Image
Spider Web Tutorial Kiss Nail Art- Neon Orange Paint Shop Polish- Charcoal 1. Start with your base color. I am again, using Paint Shop Polish Charcoal  as my base color.  2. Take your web color and either apply it to a striping brush, toothpick, dotting tool or you can use a striping polish like I have. 3. Next, make four lines on your nail starting from a corner. You can do more or less, this is just the amount that looked good for my nail. I made a vertical line, 2 diagonals and 1 horizontal line.  4. Next, connect each of those 4 main lines with a curve. I did 1 at a time so make a kind of pointed look where each meet on the main line.  5. Do another row of the curves below your first row. They should be the same singular lines you did above in #4. 6. Voila!! Enjoy and be sure to use a variety of color combos for this! Skittle spider webs are the BEST!!

Sweet Little Pumpkin Tutorial

Image
Colors used: Sinful Colors- Citrine Sinful Colors- Time Off NYC- High Line Green Paint Shop Polish- Charcoal 1. Apply base color. In this case, I am using Paint Shop Polish Charcoal . It is the perfect spooky gray for Halloween! 2. Next, I made a semi-circle-ish shape at the tip of my nail for the pumpkin. You can make whatever shape you like. Sometimes I like big fat pumpkins, sometimes I like them tall and skinny. For this, I just did a little medium shaped pumpkin.  3. Take a dotting tool or a toothpick and put a dab of the green on.  4. Dab the dotting tool or toothpick on top of the pumpkin shape for the stem. 5. Next take your black. You can use a tiny ended dotting tool, a toothpick or just the skinniest stripping brush you can find to make the triangles for the eyes.  6.Next use that same tool to create the zig zag mouth. Be patient with steps 5 and 6 as they should be very delicate strokes. 7. Viola!! Finished pumpy