How To: Glizty Glam Holiday Makeup Using Q-tips
**Sponsored by Q-tips**
This holiday, I have decided that my theme will be GLITZ! I want to be as glitzy and shiny as possible. I have been in love with all of the gold polishes this season, but on my eyes I have been loving the silver and black smokey eye look. Another thing I always love is my cotton ended best friend that is ALWAYS there when I need her. Whether it be Precision Tips or regular head, she never disappoints. This little friend of mine is one thing that I always have in
my makeup bag, nail bag, and that I always have tons of stock of in my
makeup closet. Can you guess what it is? Q-TIPS! I mean what can't you use these for? Now that you all know my little secret, I guess you can all go ahead and check out how other people use Q-tips by checking them out on Instagram! There are so many cool designs on there. Check it out! So, on with my first look....

I am going to show you how I achieve my Holiday Look with Q-tips. Sometimes we don't have the luxury to have our brushes with us all of the time. I can tell you that I still want to look beautiful without my full line of brushes. I often pack a little travel size container of Q-tips to substitute as my make up applicators.

For this easy to recreate look I will be using a shimmery cream color, a silver, a gray, a dark gray and a black. I will then be lining it with a black. I will be using Q-tips and Q-tips Precision Tips to apply all the colors and then for the blending and clean up afterwards.
First, I apply the base cream color with my finger all over my lid and up to my brow bone.

Next, apply the gray with a Q-tip in the entire crease. It doesn't have to be neat, because remember this is a smokey eye.

Take that same Q-tip and dip it in the dark gray and use it in the outer crease to outline and pull out the wing tip.
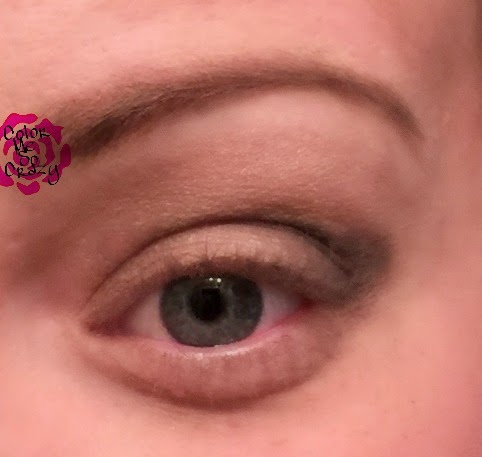
The next step is to take a Q-tips Precision Tips and dip in the black and use it to pull out the black in the outer corner of the eye. It's ok if you put these colors on thicker because you are going to blend it all together soon.You are going to use that same black to line the bottom lash with the other side of your Q-tip you used to do the upper lid.

Now, to blend!! This is the fun part. Take a regular Q-tip and puff out the head to make it easier to blend and so it's not such a harsh line when you are blending. It will make it nice and soft, almost like a sponge. Now, go to town. Your Q-tip Holiday Look can be as bold or as subtle as you want it to be. It depends on the blending. If you blend to much, you can always add more color, just as you did in the steps above.

One eye, I did a really dramatic look and the other I did neater and more straight lined look. The neater eye, I used the Q-tips to clean up the lines. For both looks, I cleaned up the fallout from the application all of the leftover shadow with the Q-tips as well.

What do you think of this look? Is it something you would wear to a holiday party? How often do you use Q-tips in your daily beauty routine?
 Most important did you get to check out the Q-tips Instagram page?? What was your favorite look?
First, I apply the base cream color with my finger all over my lid and up to my brow bone.
Next, apply the gray with a Q-tip in the entire crease. It doesn't have to be neat, because remember this is a smokey eye.
Take that same Q-tip and dip it in the dark gray and use it in the outer crease to outline and pull out the wing tip.
The next step is to take a Q-tips Precision Tips and dip in the black and use it to pull out the black in the outer corner of the eye. It's ok if you put these colors on thicker because you are going to blend it all together soon.You are going to use that same black to line the bottom lash with the other side of your Q-tip you used to do the upper lid.
Now, to blend!! This is the fun part. Take a regular Q-tip and puff out the head to make it easier to blend and so it's not such a harsh line when you are blending. It will make it nice and soft, almost like a sponge. Now, go to town. Your Q-tip Holiday Look can be as bold or as subtle as you want it to be. It depends on the blending. If you blend to much, you can always add more color, just as you did in the steps above.
One eye, I did a really dramatic look and the other I did neater and more straight lined look. The neater eye, I used the Q-tips to clean up the lines. For both looks, I cleaned up the fallout from the application all of the leftover shadow with the Q-tips as well.
What do you think of this look? Is it something you would wear to a holiday party? How often do you use Q-tips in your daily beauty routine?
**Sponsored by Q-tips**


Comments
Post a Comment
Thanks for the encouragement!! It is what makes Color Me So Crazy :)